
This will be a difficult post to write; so many thoughts are swirling in my head. I think most of us who are still blogging about our makes, usually write about our successes. We have the idea, buy the fabric, pour all the skill we can muster into a garment, and arrive victorious at the end. Typically, I snap some photos in the backyard, pat myself on the back and it’s a wrap. I’m off to the next project feeling quite chuffed with the latest addition to my me-made wardrobe.
Not so with this pair of trousers.
But I’m getting way ahead of myself. Let’s back up.

The road from theory to reality has been anything but a straight line in my trouser journey. It started with an online Zoom class offered by The Tailoring Academy in Macclesfield, UK. It was an amazing experience, a long sought after dream really; and I was eager to put what I had learned into practice.
Because I’m a solo act, measuring myself accurately proved to be less than ideal; but I knew this going in. I did the best I could, viewing myself in a mirror and taking measurements from a pair of trousers that I thought fit me well. I ordered in two rolls of Swedish Tracing Paper and set about following the class worksheets, step by step.
I had such high hopes! I made up the muslin complete with a zipper and waistband. All the time I was working on it, I envisioned that moment when I put them on and bask in the perfection of the fit. Trousers made to my unique measurements. How could they not be perfect?
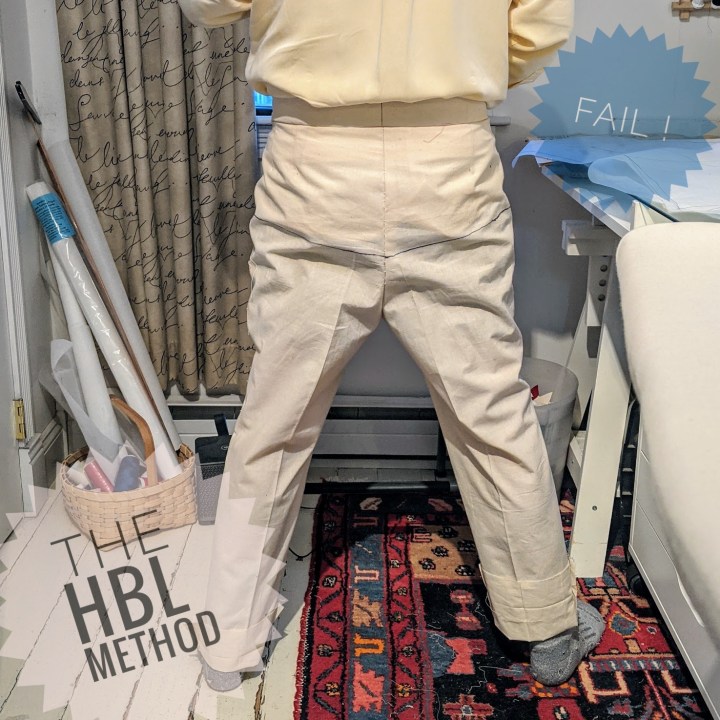
Oh, silly man!…..This was the result.
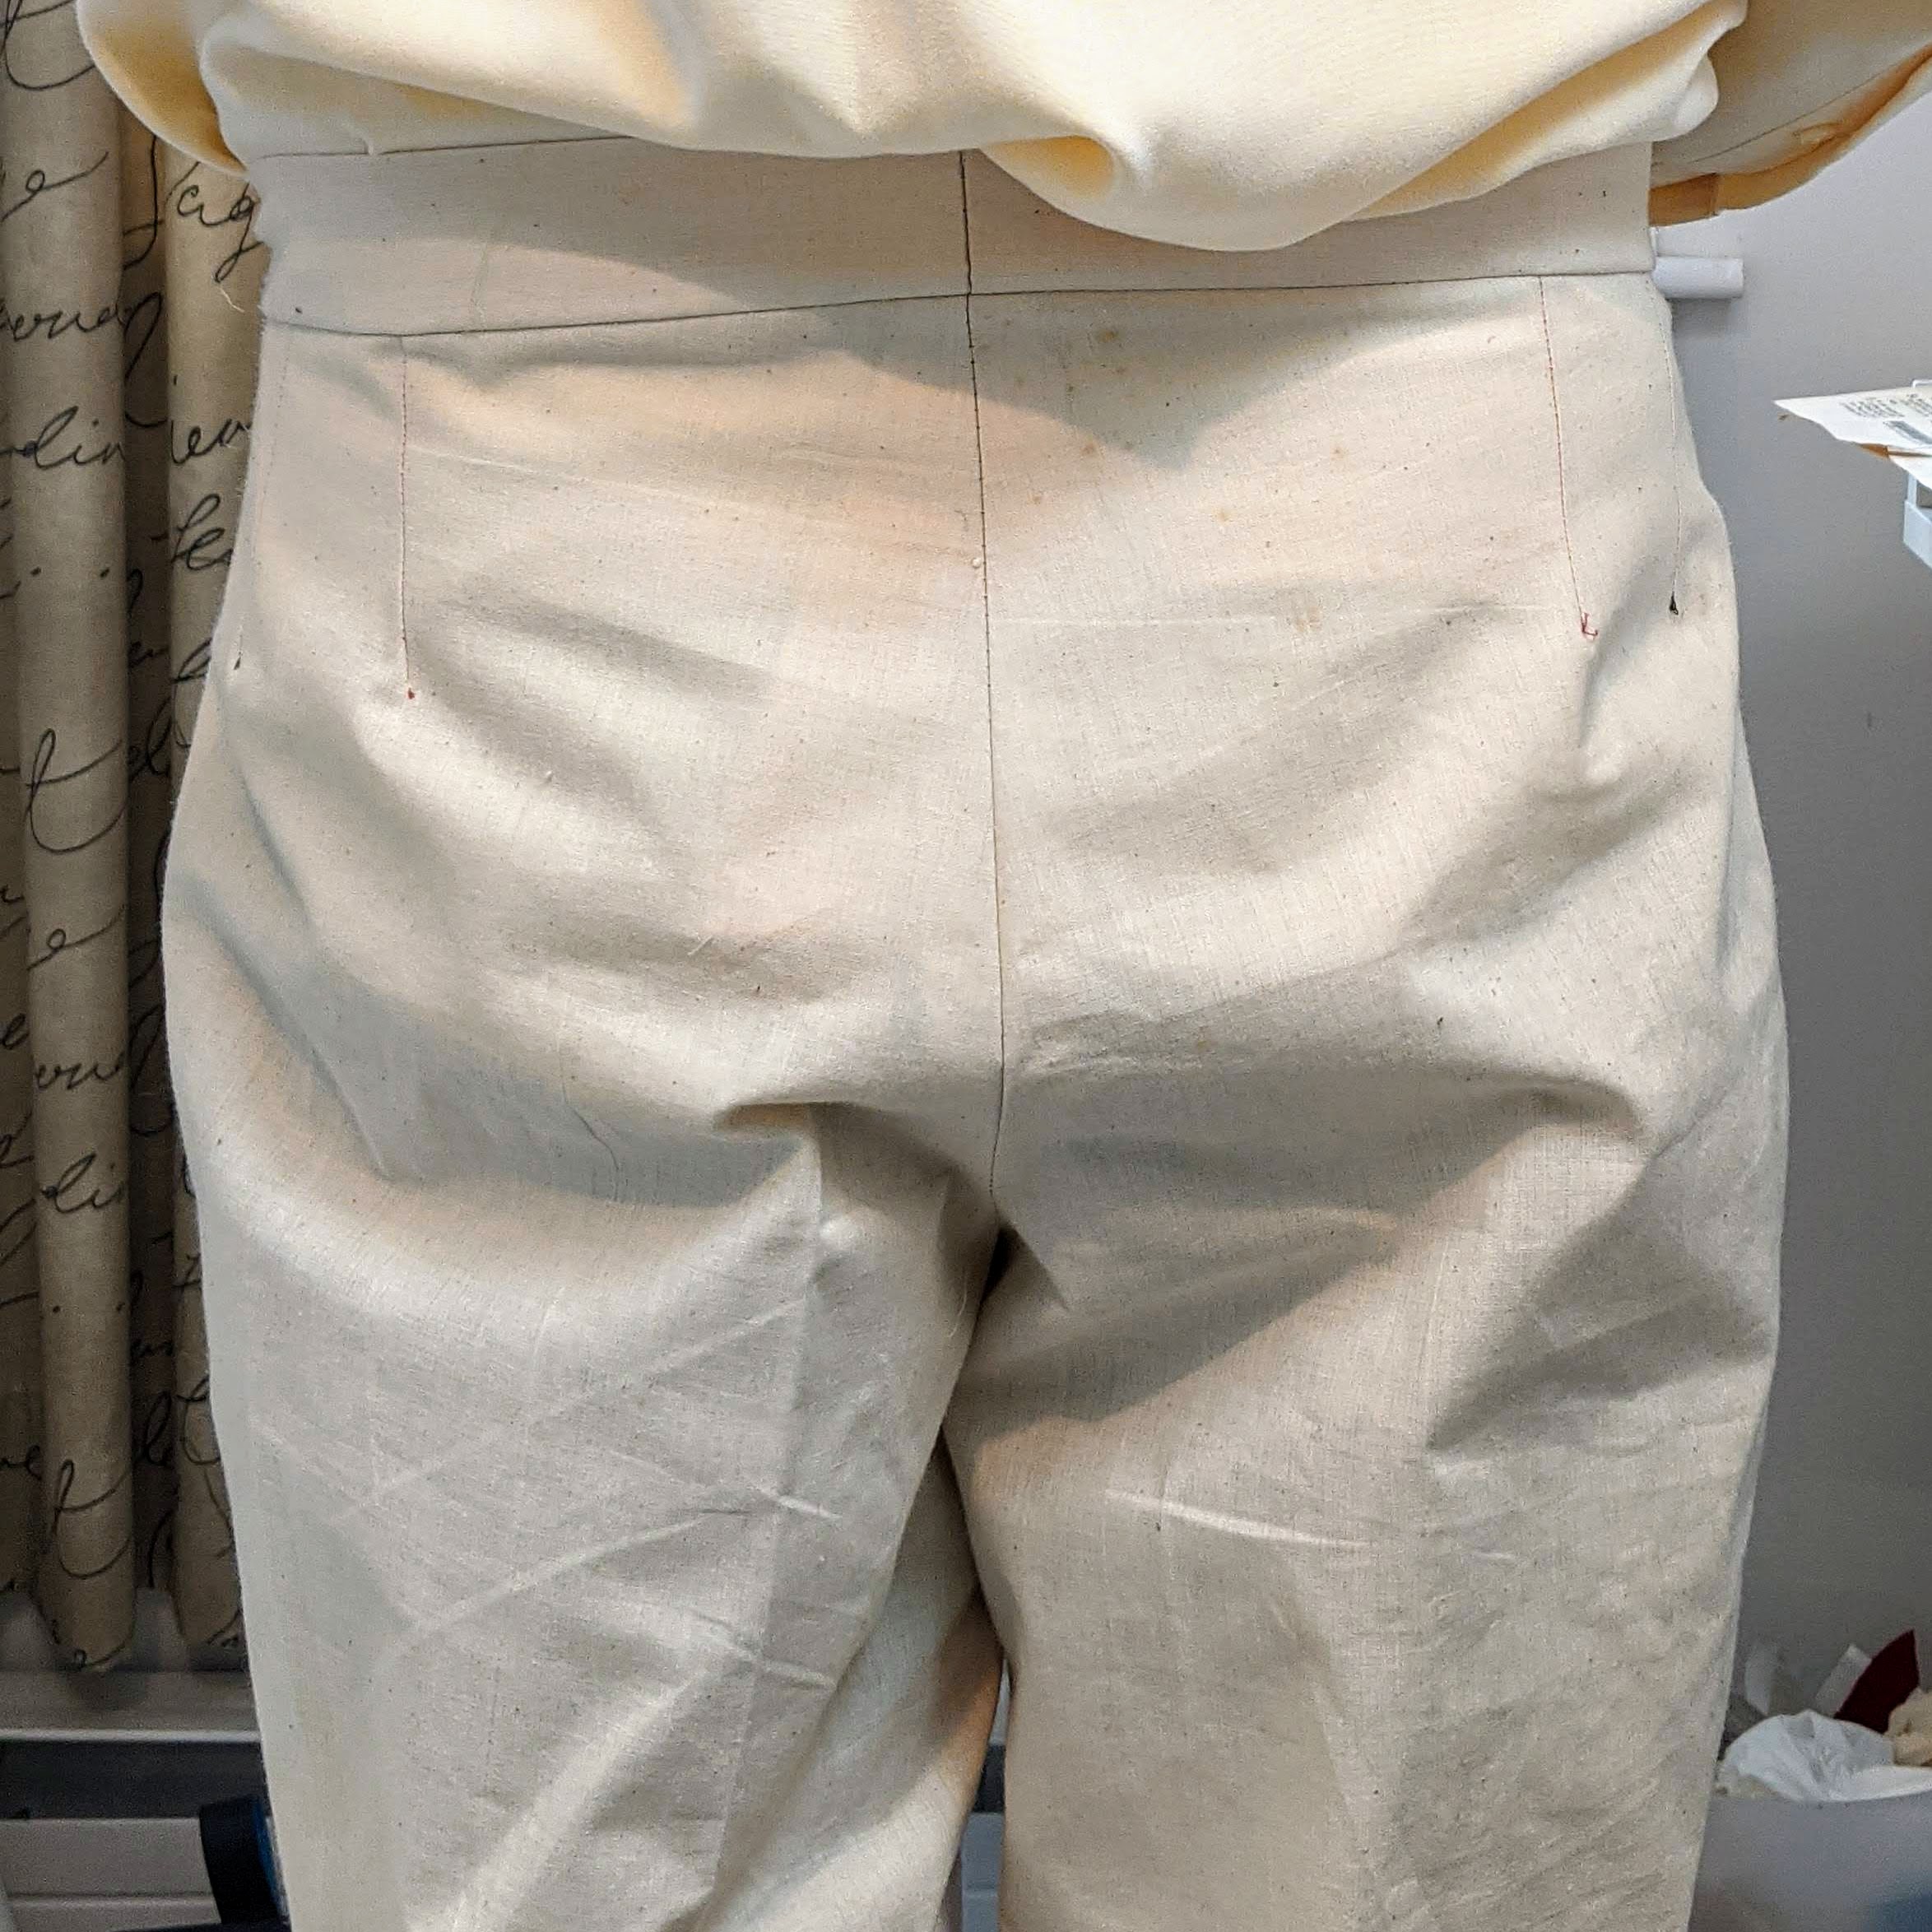
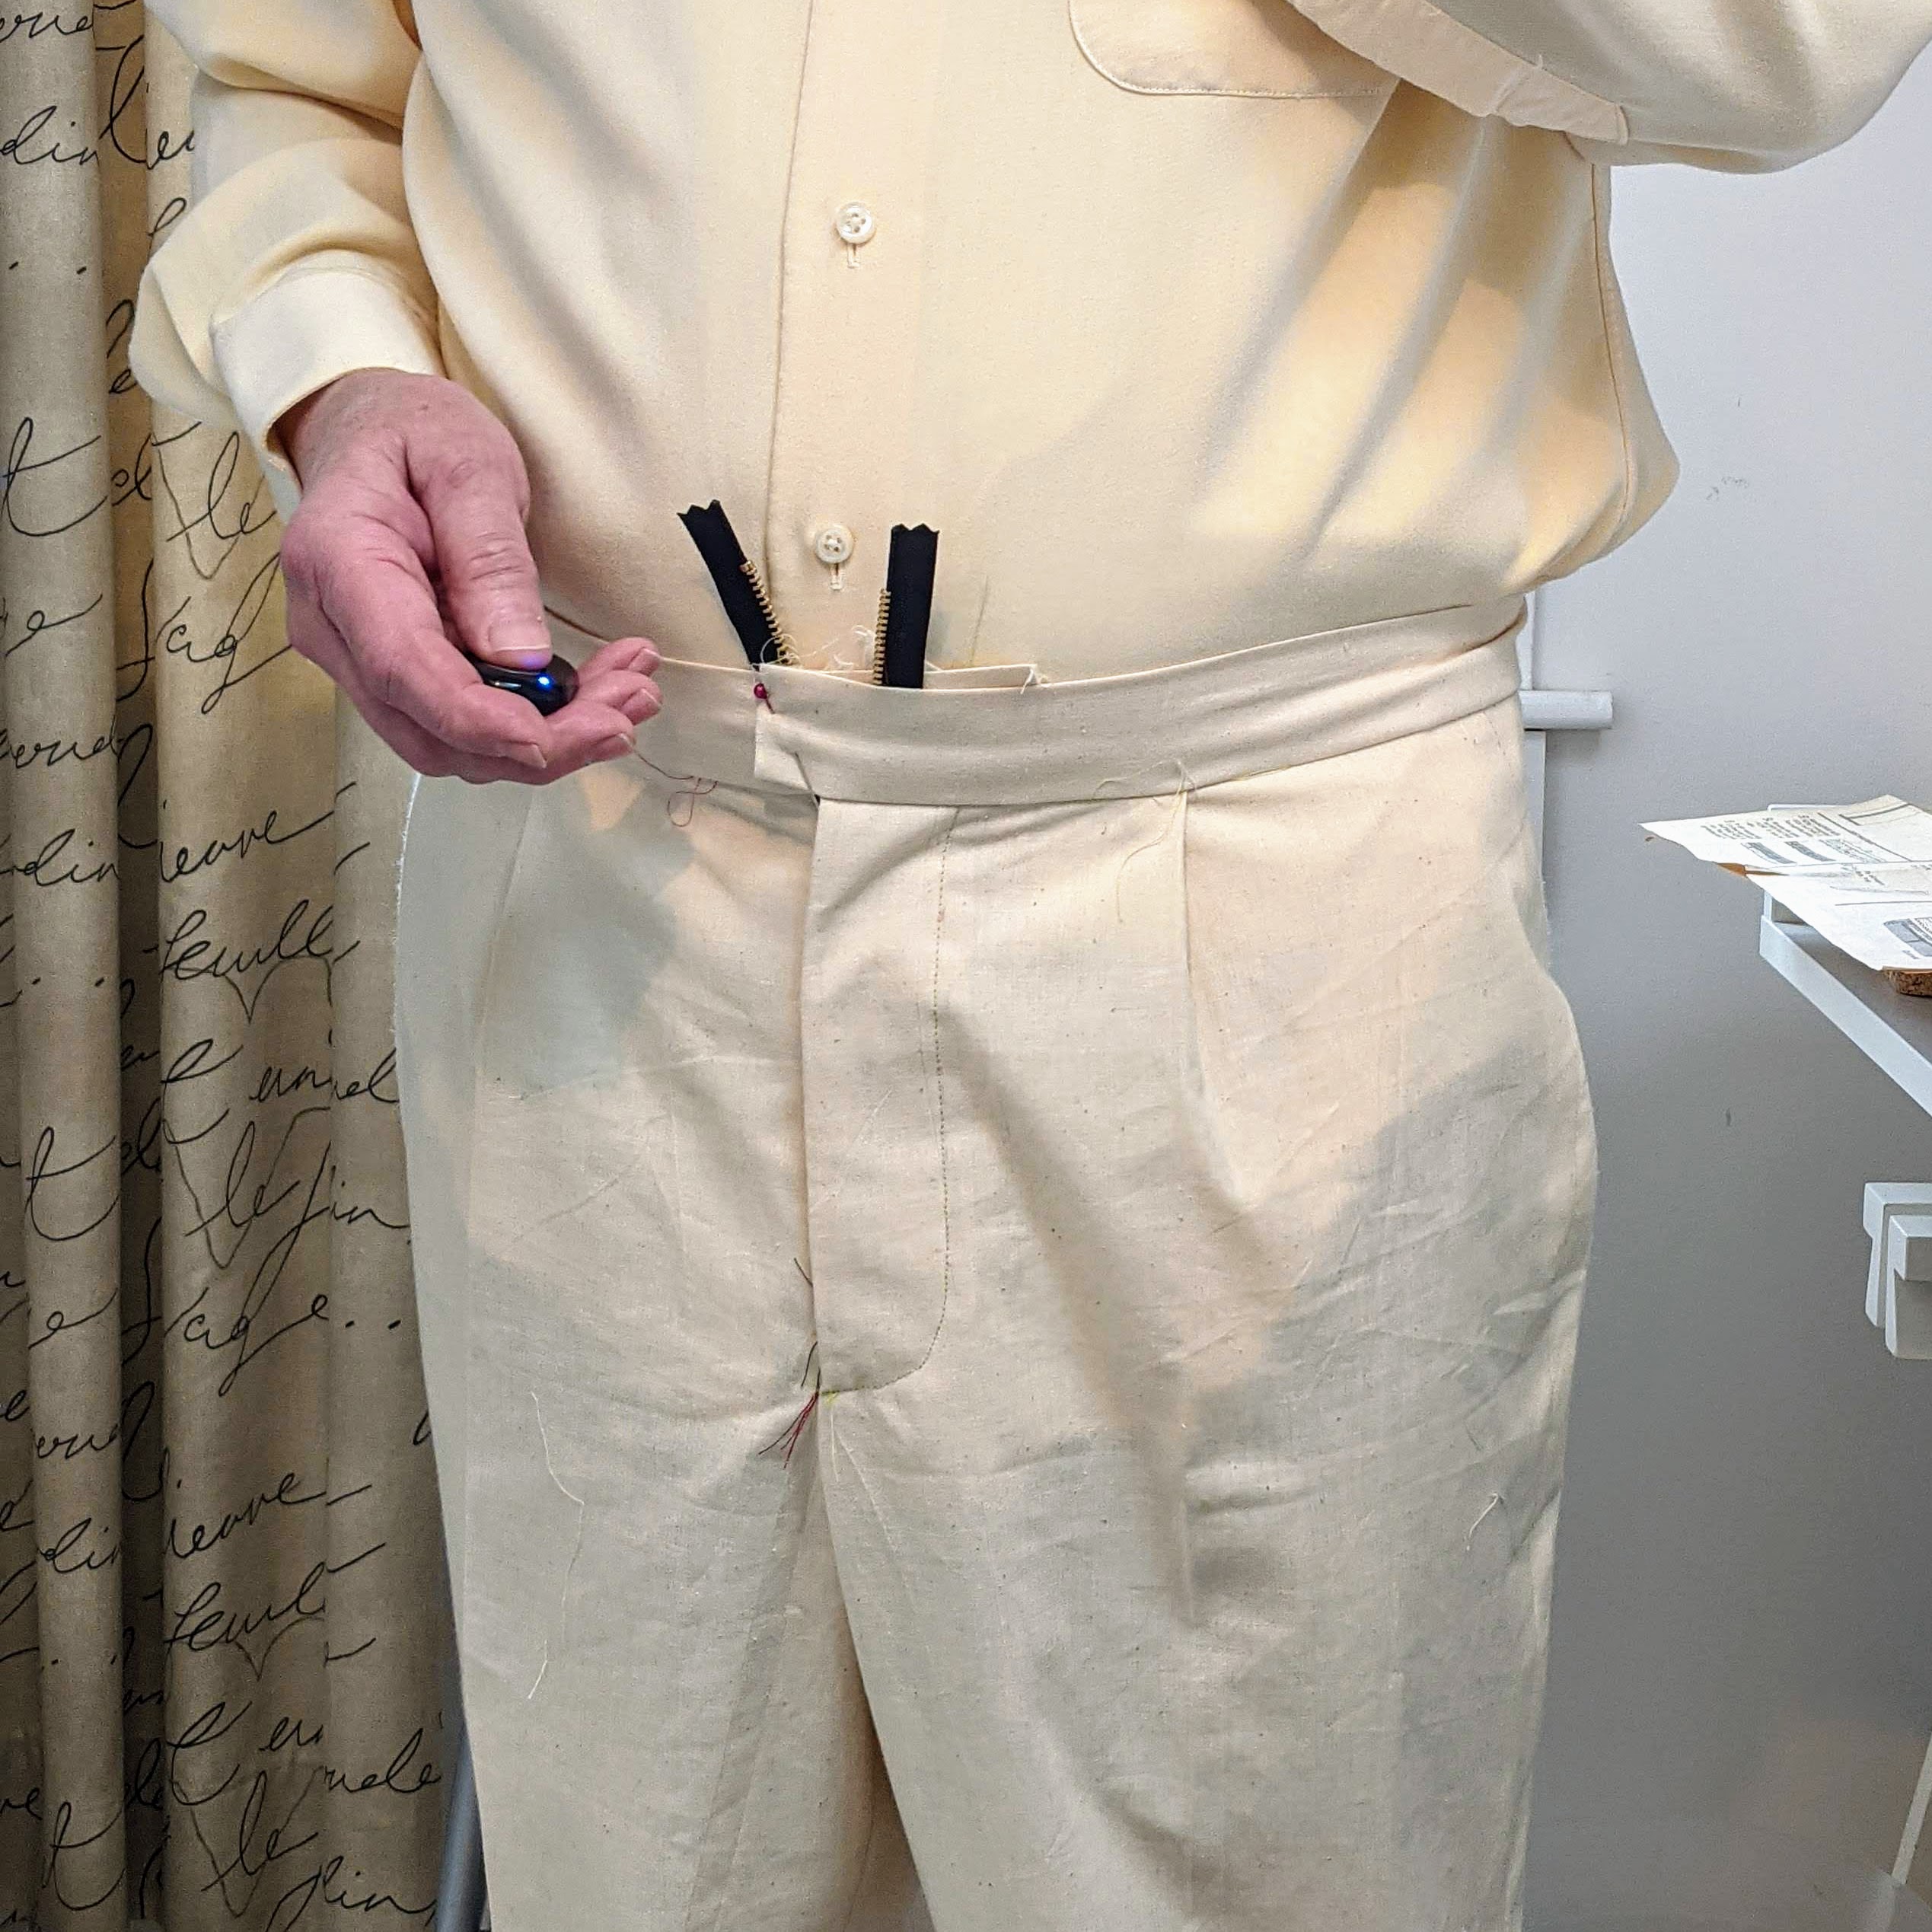
Talk about the agony of defeat. Way too much fabric in the rear. A side seam that appears too far forward. Excess fabric at the hip…jodphurs? saddle bags? How could it have gone so horribly wrong?
If there’s one thing that becomes evident when you’re on the “pants journey” it’s that you’re not alone. At any given time there are sewists around the world that are going through exactly what you’re experiencing. The struggle is real. We scoop out crotches, put in darts (or in my case, take them out), let out seams here or reduce them there. We confront our bodies as they are, and then try to unravel the mystery of “what has to happen here”.
I tried the Horizontal Balance Method to no avail (other than a wedgie!) I quickly abandoned ship with this process.
I consulted Threads magazine articles and several blogs, all the while making a tweak here and there, hoping for the best. Eventually, after two muslins, I came to the conclusion that what I had was unworkable, and that a new set of measurements was in order. So I went back to the drawing board, literally.
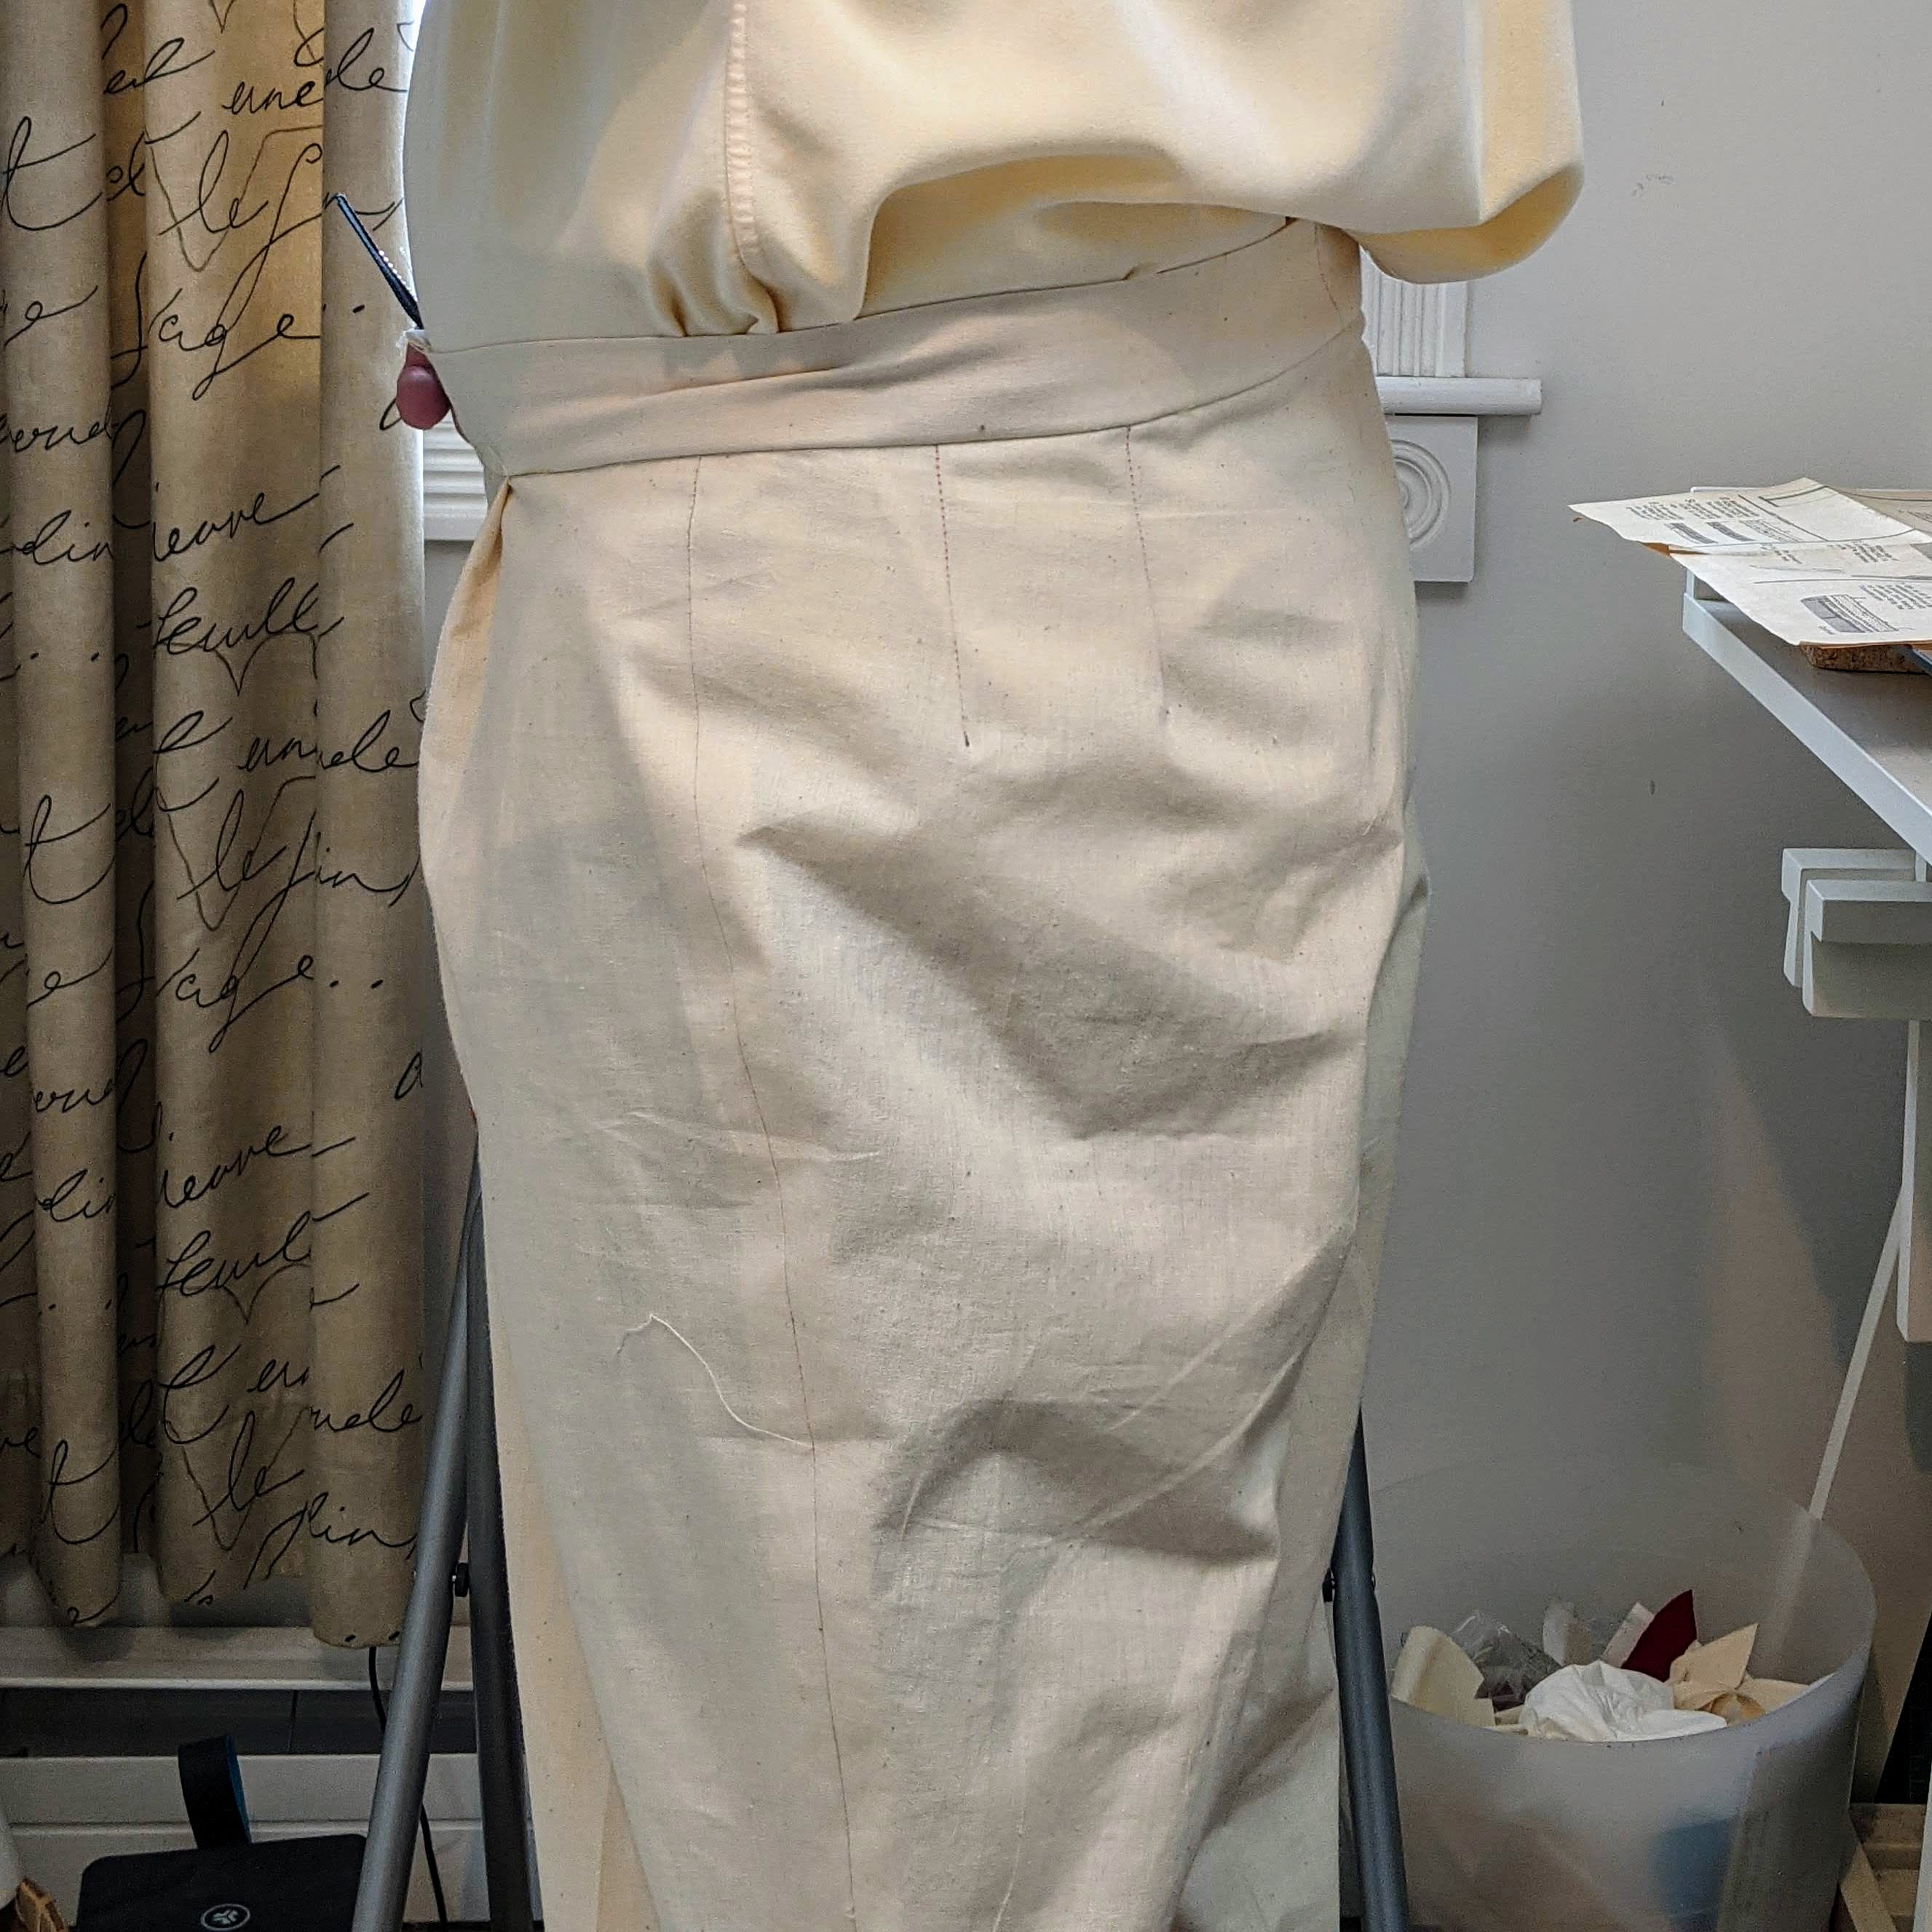
This time around I tied 1/4″ elastic around my waist, widest hip, knees and ankles. I then ran my tape measure, (taped to the sole of my shoe), under the elastic bands to my waist and recorded my measurements while standing next to a full length mirror.
The most revealing measurement was that my fullest hip proved to be higher than the point calculated in the draft. This greatly improved the fit through the hips, and the jodhpur effect was eliminated. Yay! I eliminated one of the darts at the back to accommodate my flat buttock, and scooped the crotch curve slightly. With each adjustment I did a “sitting and stair climbing test”. As an Instagram follower advised, for those of us with straight hips and a flat seat, it’s possible to fit to the point where one has “cocktail party pants”. You look great standing up, but can never sit down!

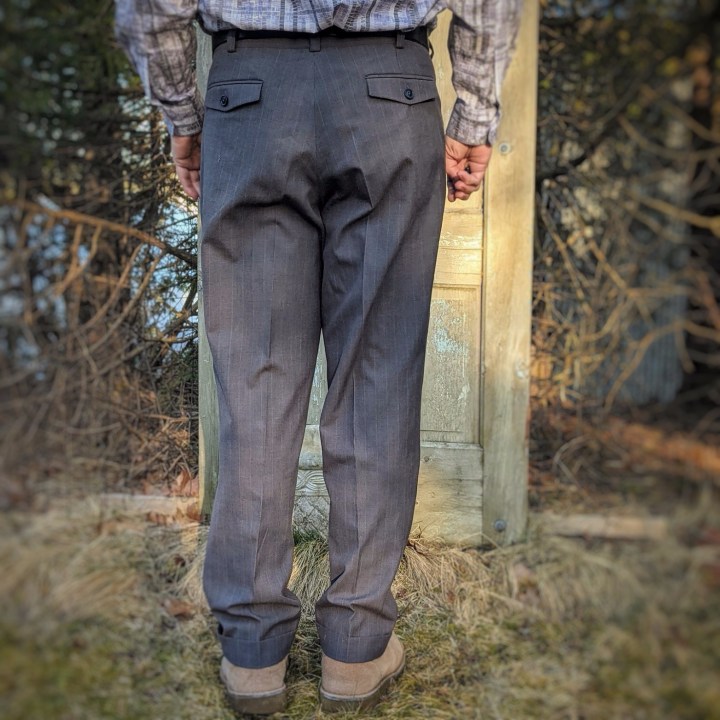
In retrospect I should have stopped here. BUT…. I convinced myself that the front crease was running off to the sides, and that I needed a knock-knee adjustment. Believe me, there IS such a thing! I pulled out my Cabrera tailoring text and went down that rabbit hole. It was totally unnecessary (maybe a figment of my imagination), and I’ll have to undo it in the next iteration, but this is how the journey goes. Sometimes the improvement we seek fixes one issue, but may come with some unintentional and unwanted consequences. All part of the process.
Unable to face yet another muslin, I found some pin stripe cotton suiting in the attic that I had completely forgotten about. I purchased it online years ago and it was a big disappointment: so off to the attic it went. It finally found its purpose as “wearable muslin” #4.
I ended up putting much more work into this “muslin” than I ever intended. But it seemed necessary to accurately evaluate the draft. Plus there was the possibility that maybe I’d “nailed it”! Oh, we sewists on the trouser journey……always hopeful!
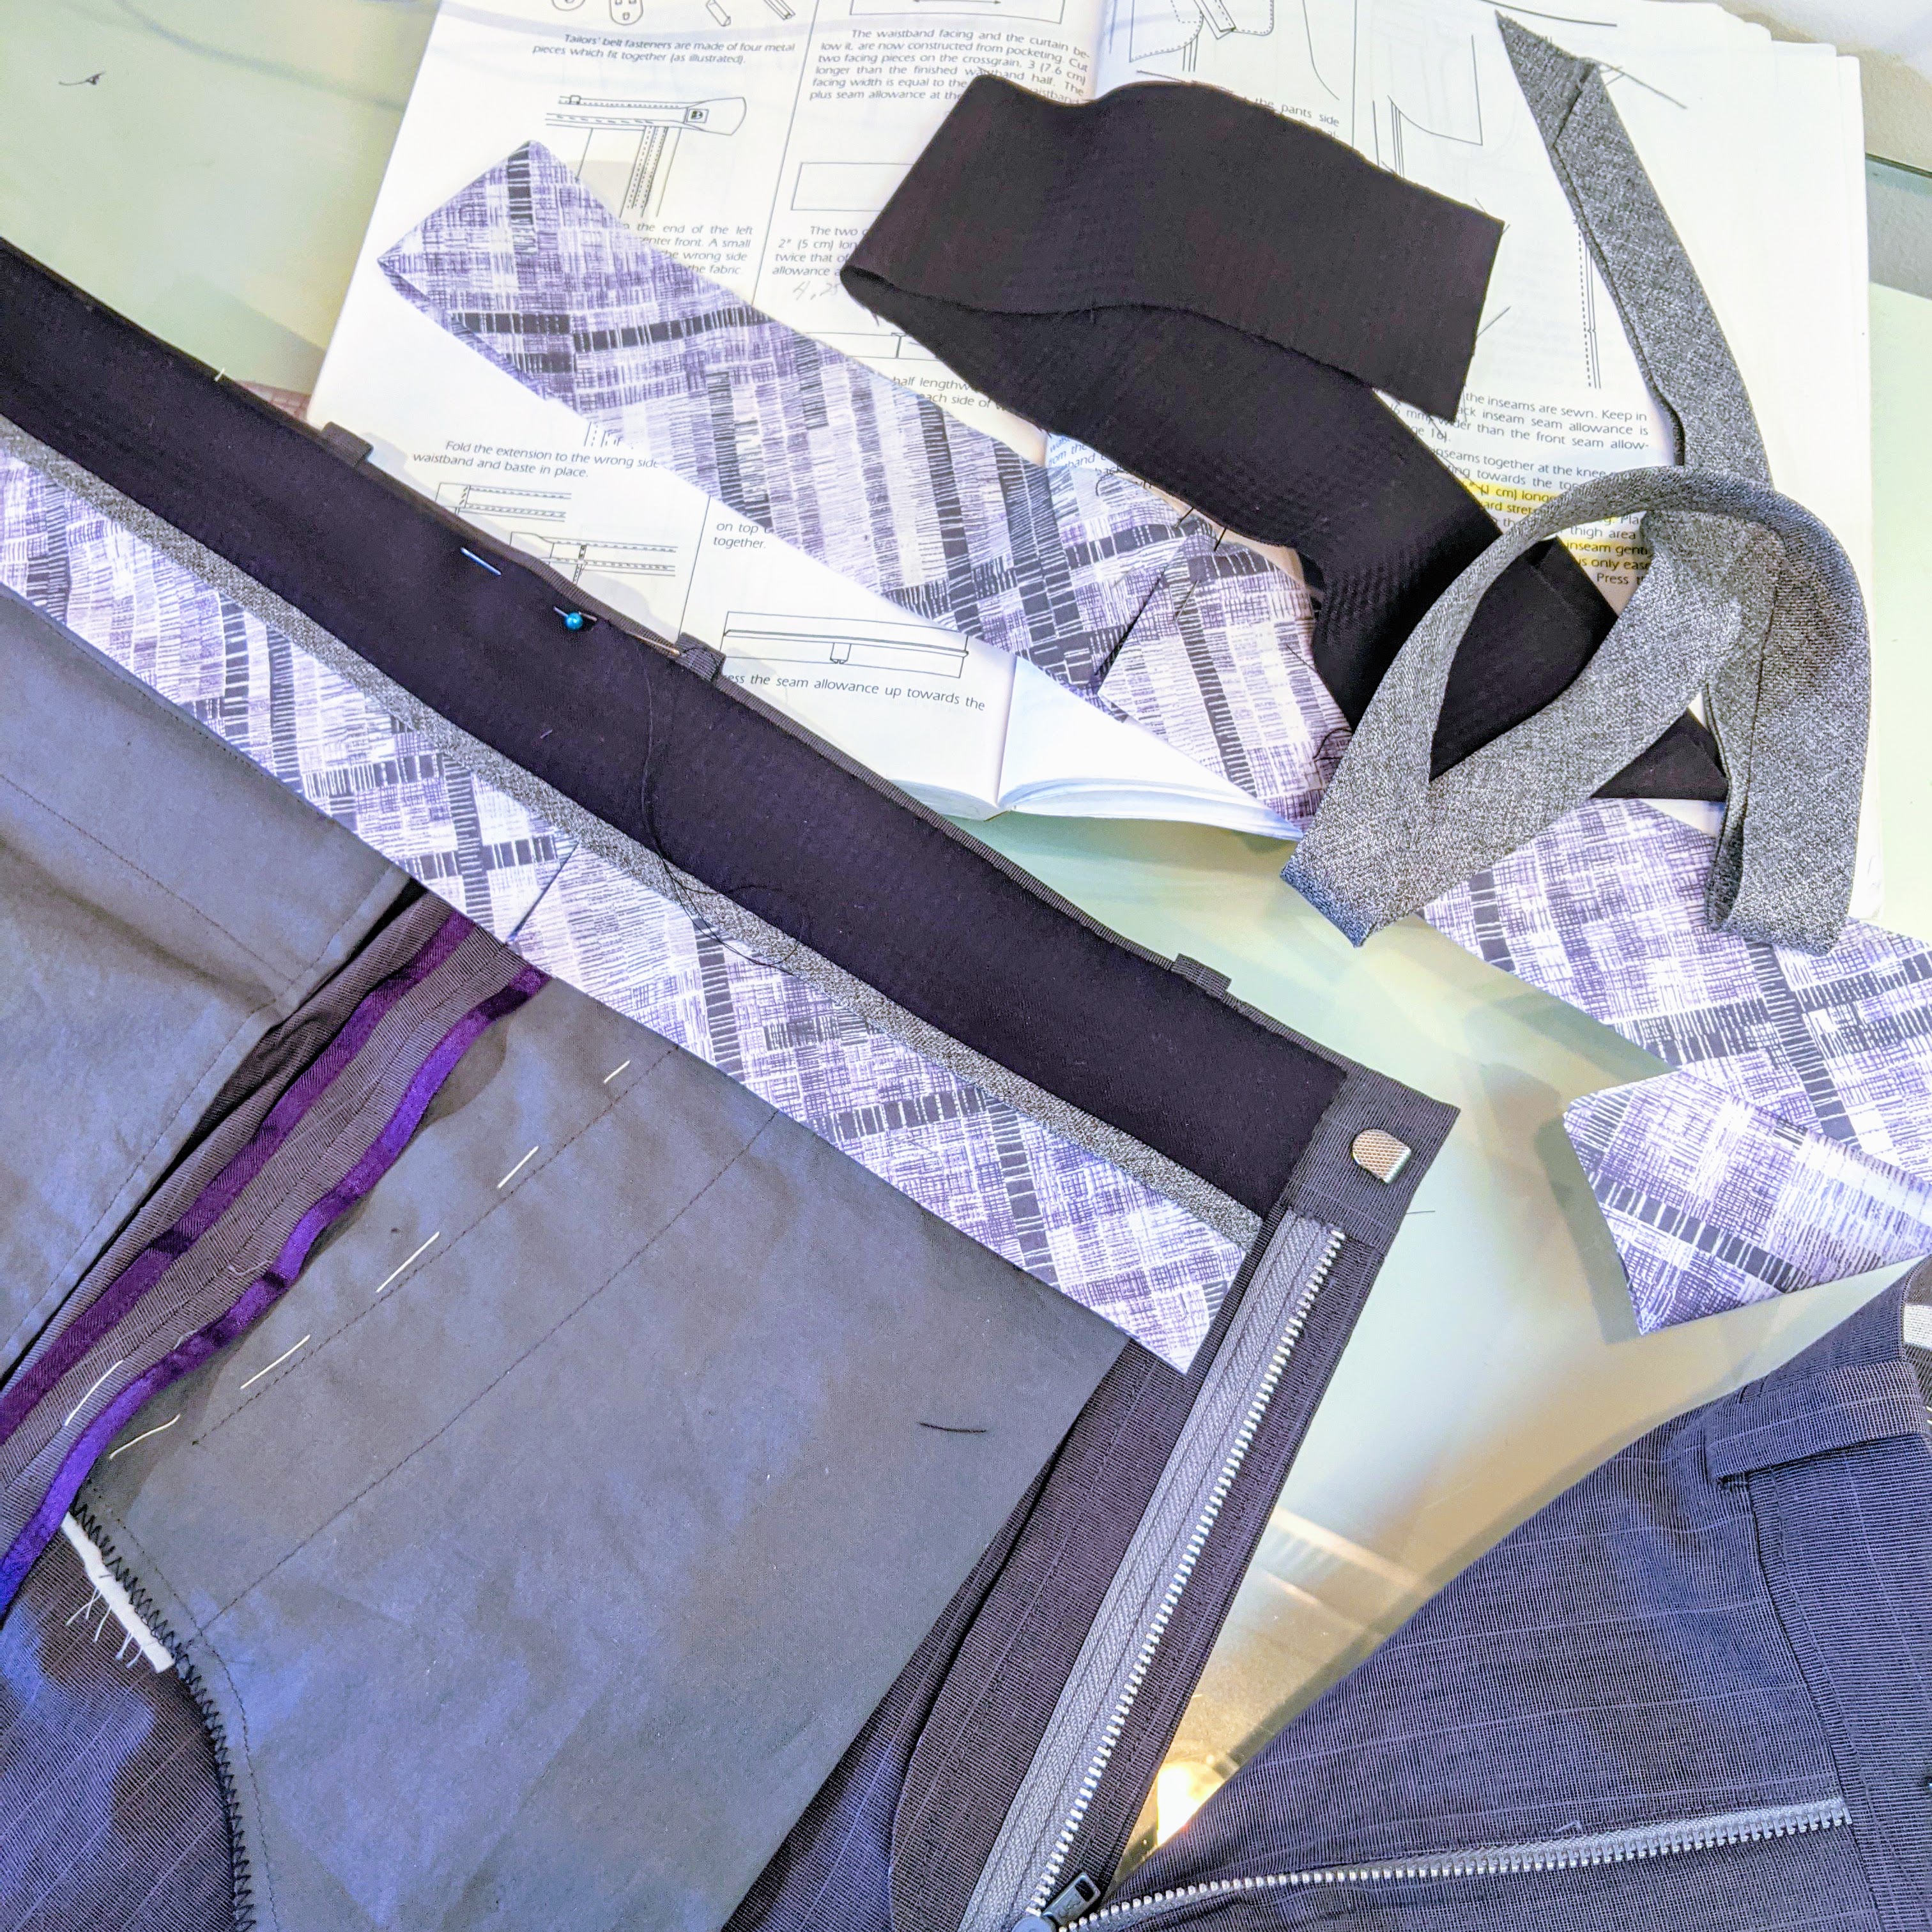
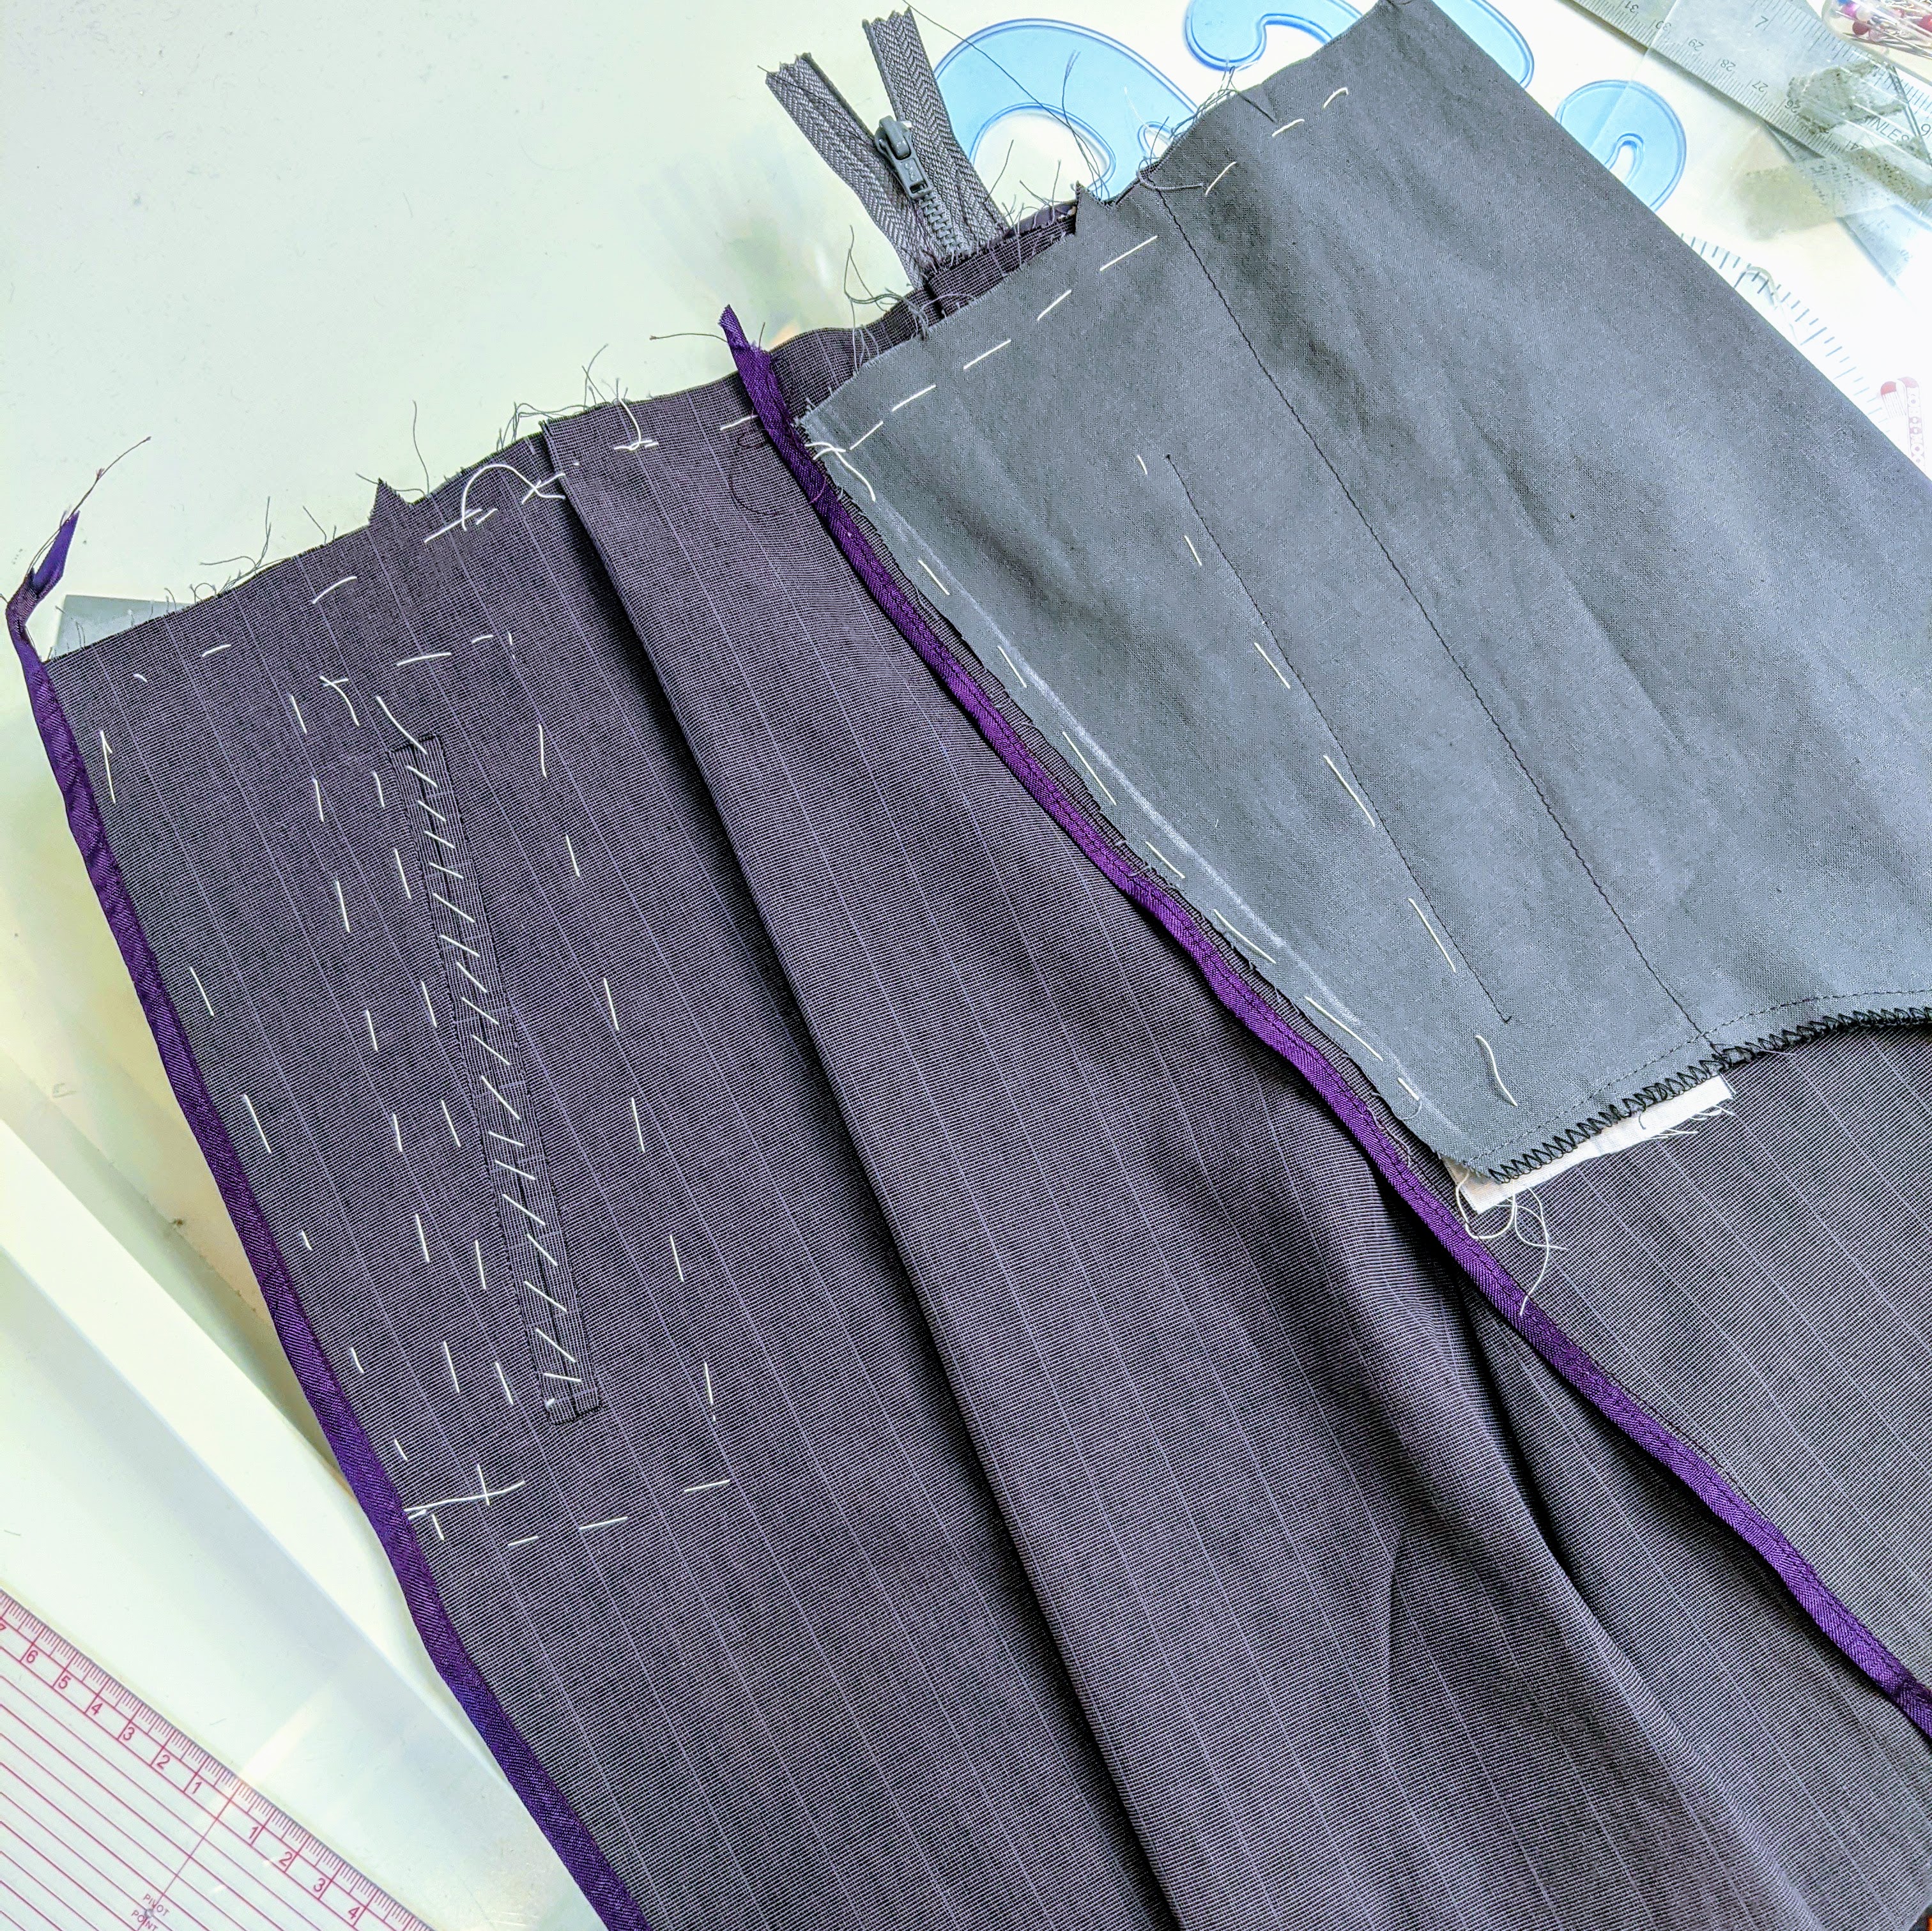
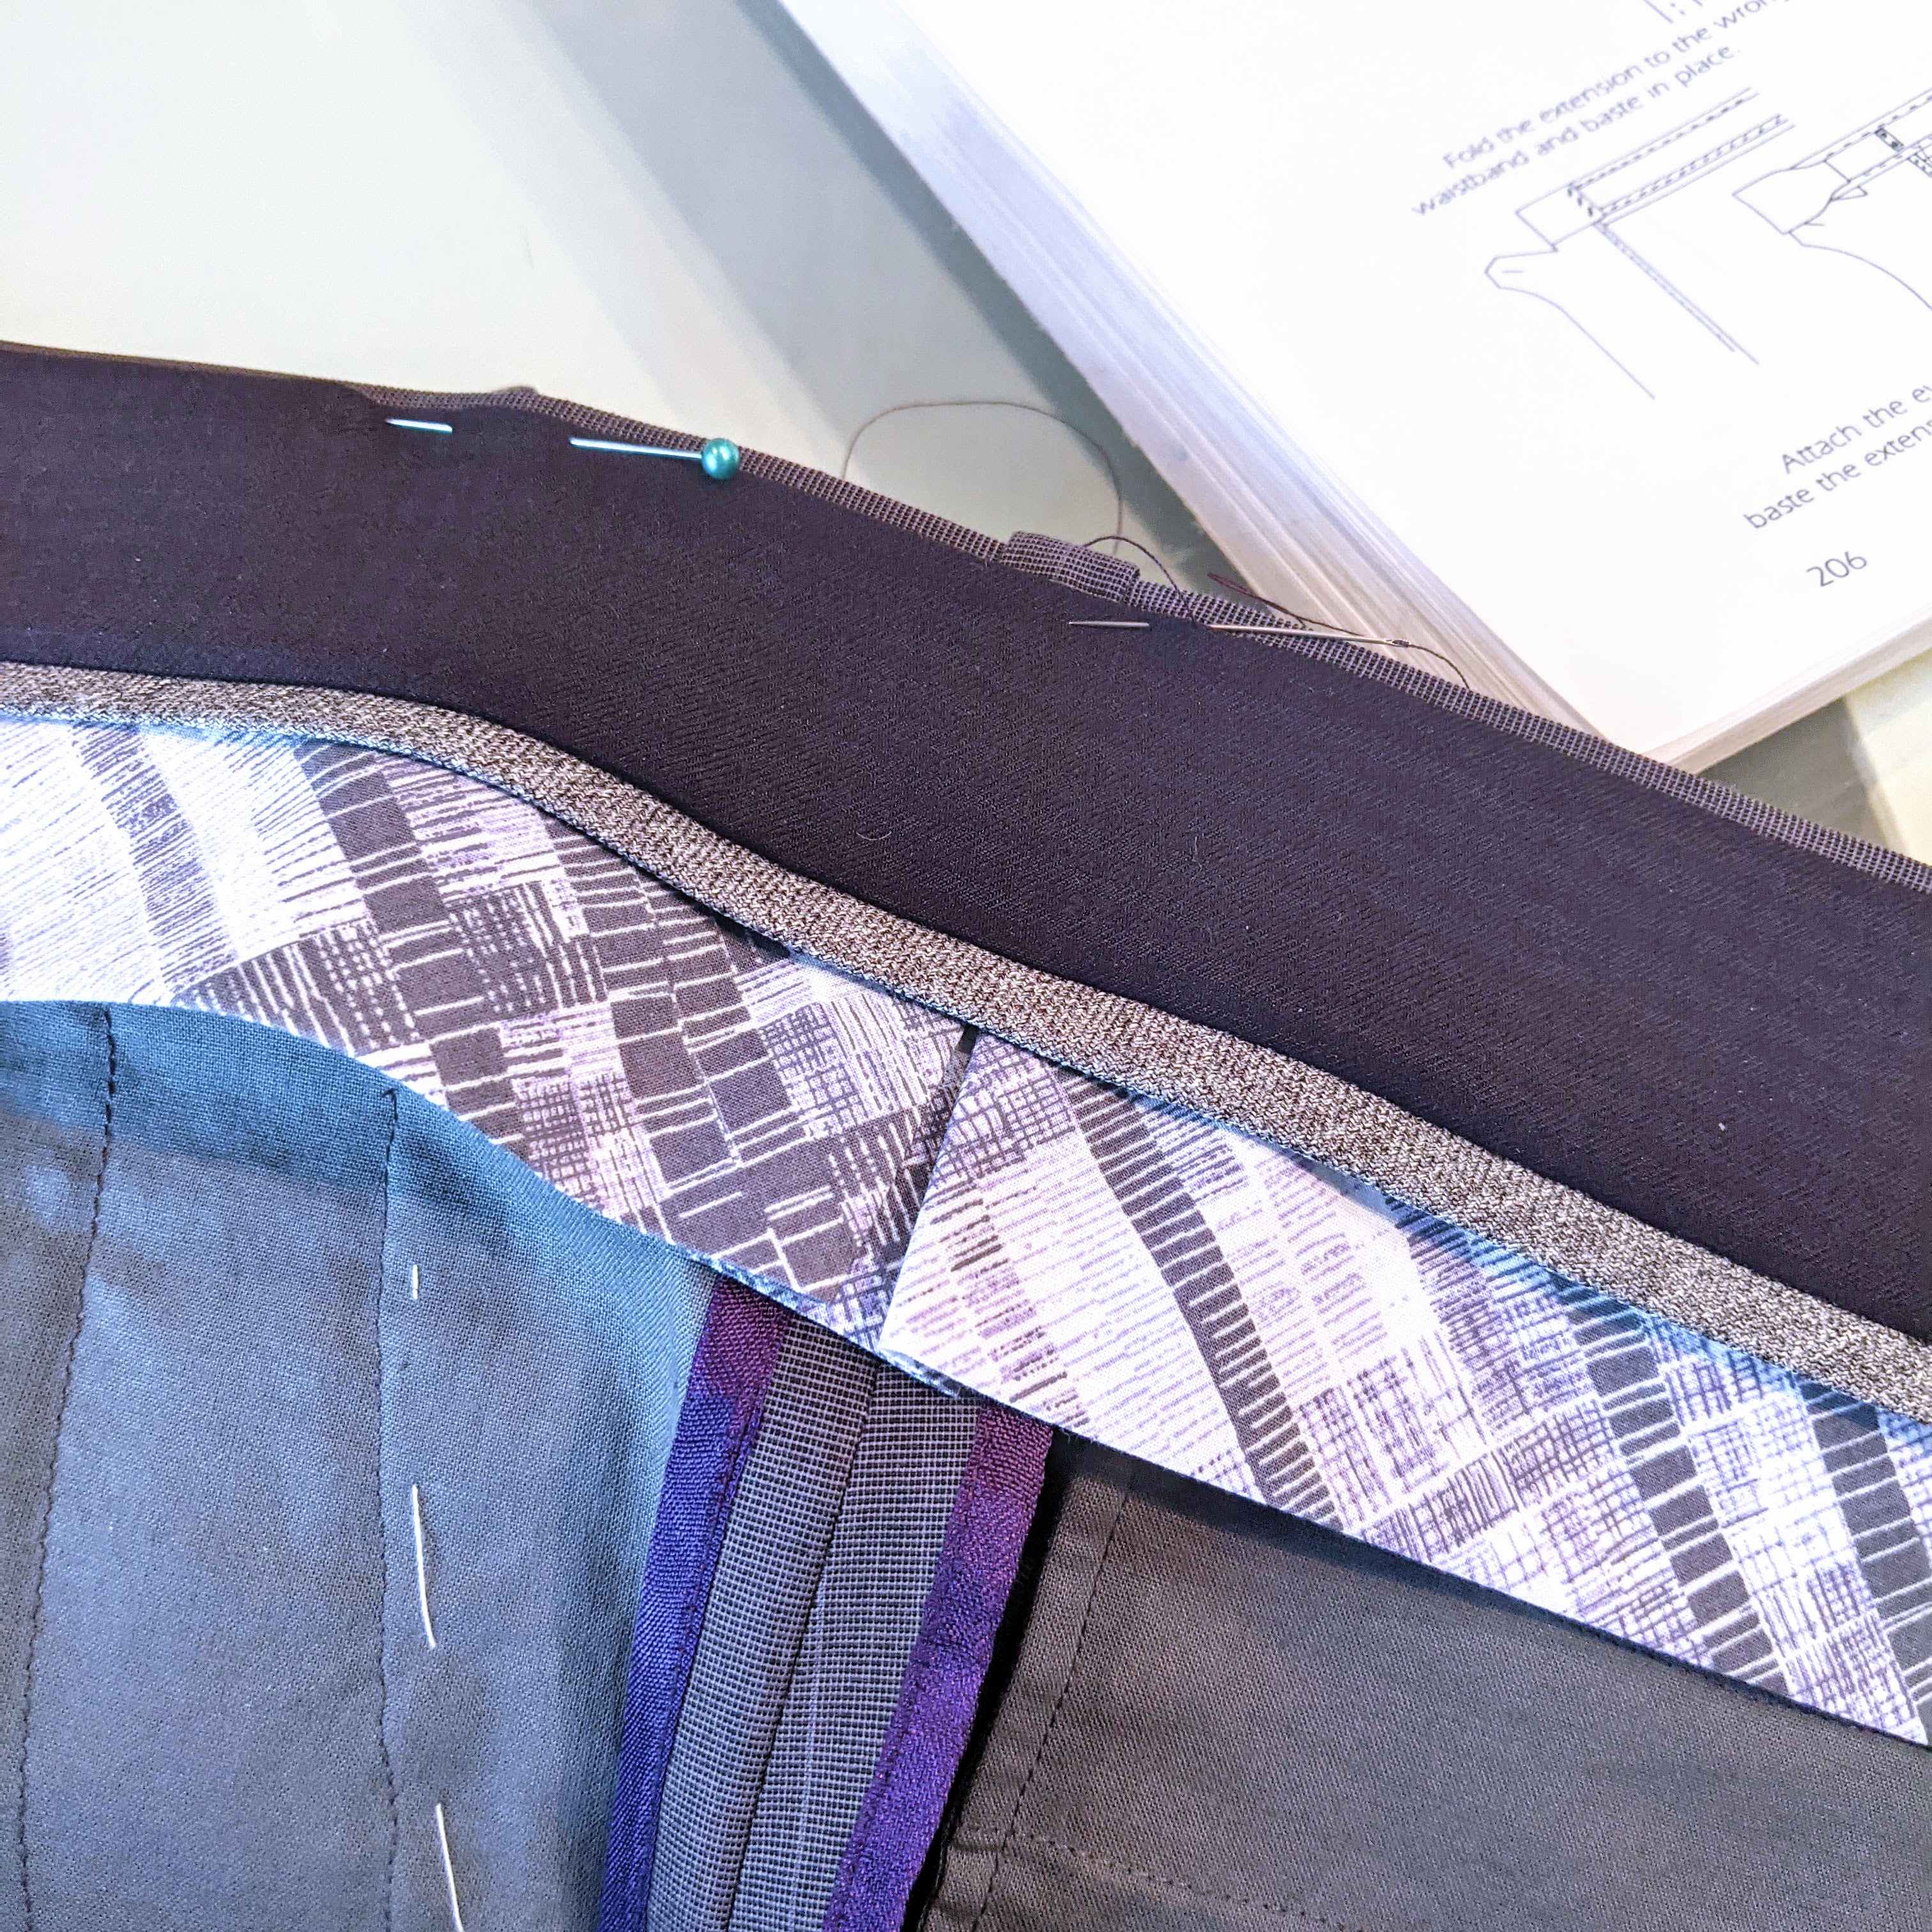
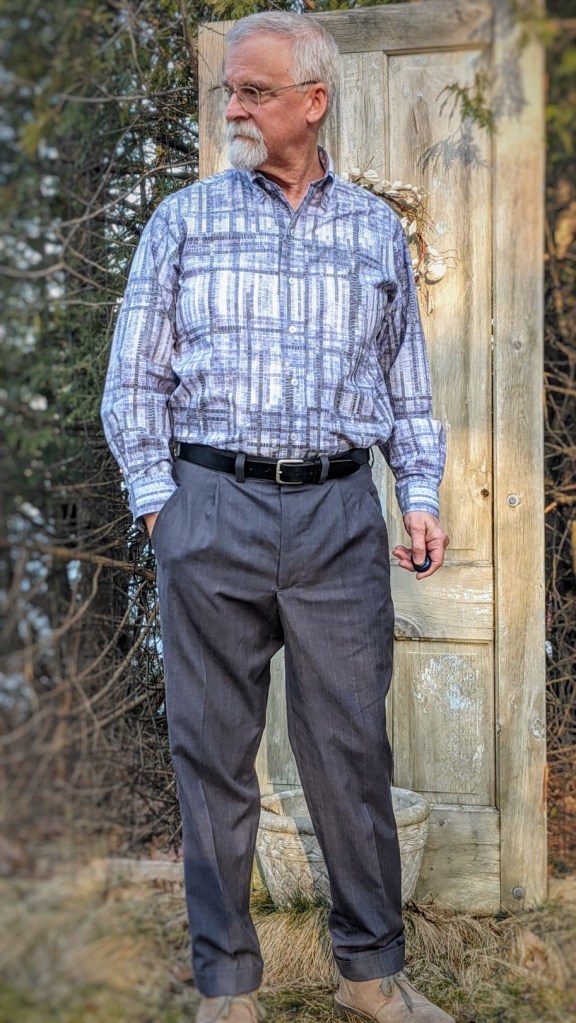
French fly, jetted pockets, waistband curtain, cuffs …… the whole enchilada! And where did it all lead?
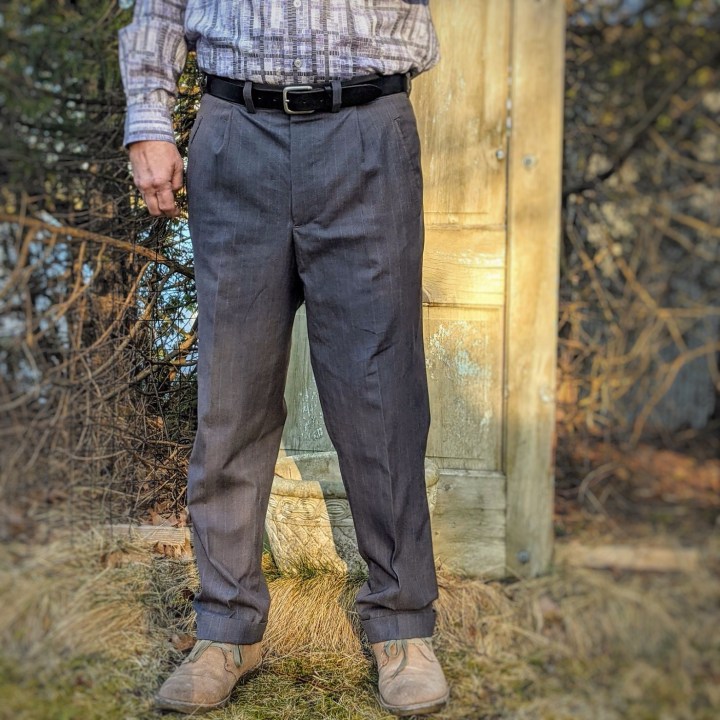
Here. The good and the bad. Changes that worked, others that didn’t. A mix of success and disappointment. An unreached destination. A way station on the journey.
I take some comfort in knowing that somewhere in the world, there’s a sewist standing in my shoes. Someone who’s looking at their photos and thinking. Just thinking. Thinking about so many “What ifs”. It’s like a background hum. Some will jump back into the process. I need to take a break and regroup.
When I look at the bigger picture I have to realize that I started with little more than a set of numbers. Those numbers turned into a pair of wearable trousers. The trousers that I dreamed of? … No. That pair is still out there. But for now I’m just going to wear these with all their flaws…and continue to think.
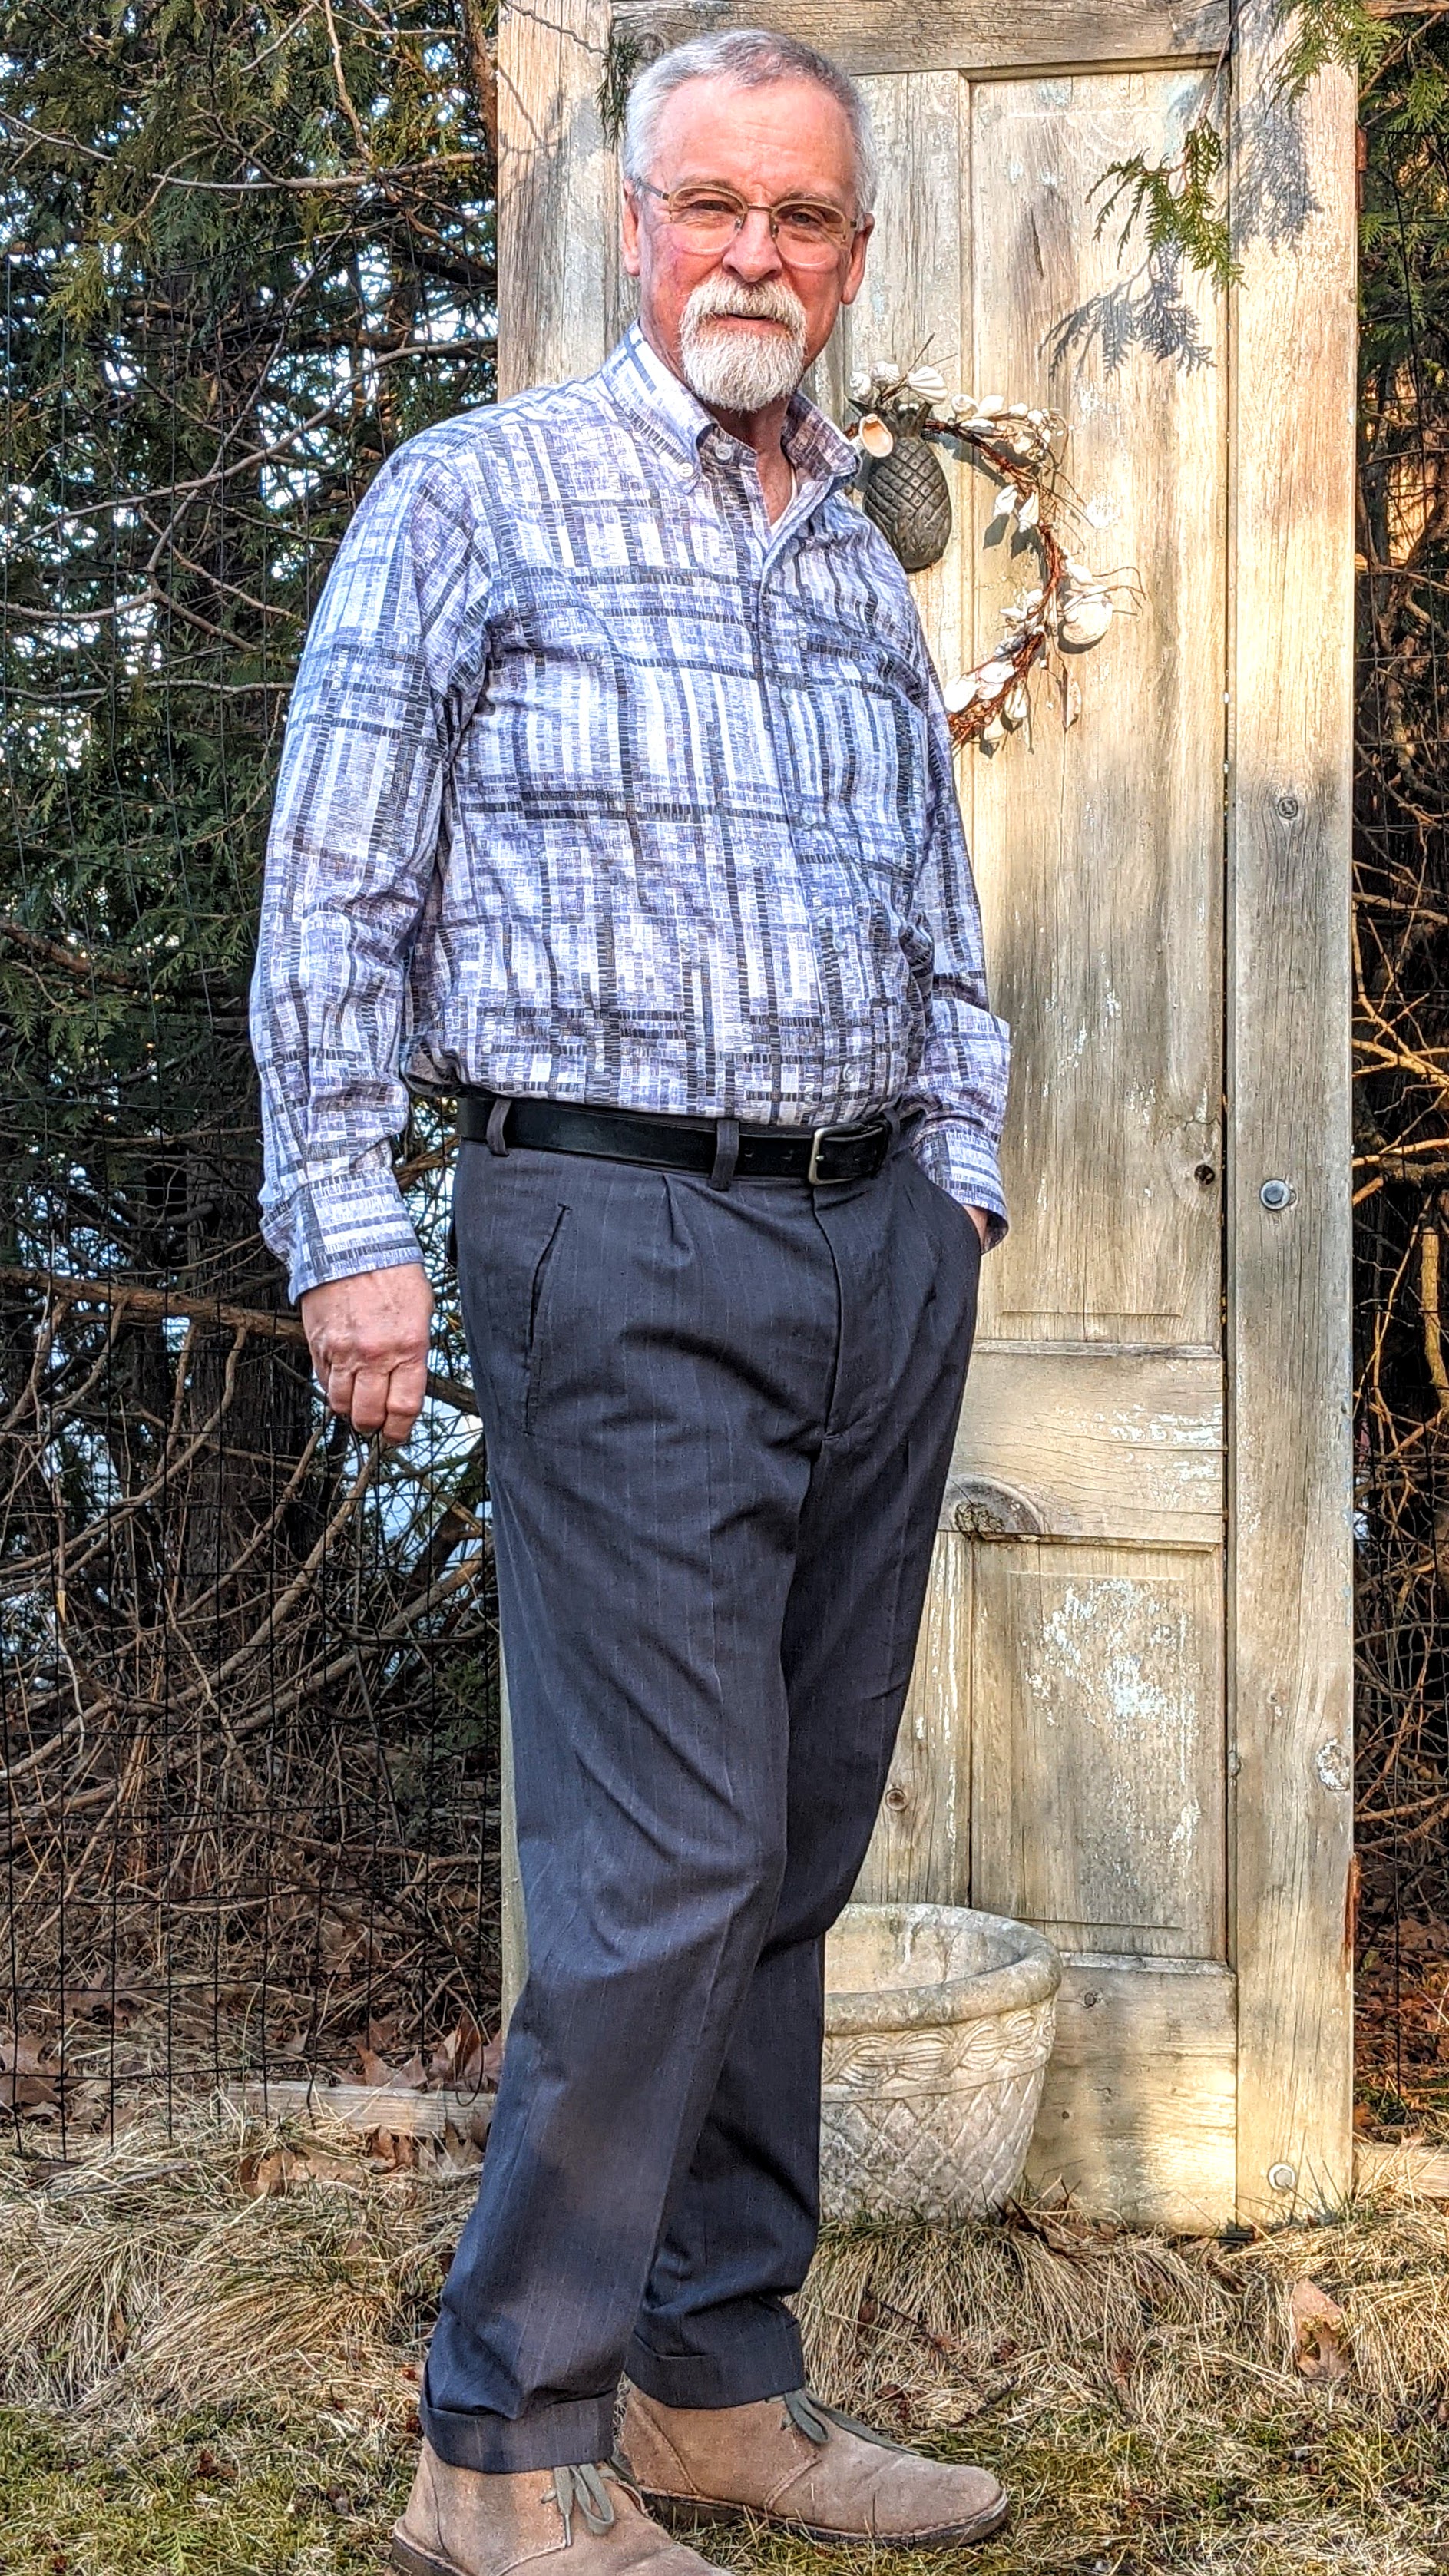


If there’s a bright side to this story, they actually go well with some of the shirts I’ve made. So I’ll take that win!
As always, happy sewing to all. Enjoy your journey, wherever it takes you.

Great post. I am curious what, in your view, are the ‘failings’ of the final pants? What were you hoping for in terms of fit.
It’s always a journey, no matter what.
LikeLiked by 2 people
So many problems, so little time. The drag lines at the pleats are driving me nuts. (I may have an idea of what has caused them).The Knock knee adjustment has caused the crazy twisting behind my right leg. Why not the left??? There’s another mystery! Fortunately there were some successes. This pair of trousers fits me better through the hip than any pair that I’ve ever bought or made. Now I just need to get the rest of them to behave.
LikeLike
I’m sure you’ll get to the point of solving all of your fit problems. Your obvious devotion to sewing and skill are remarkable.
LikeLike
If I may be so bold and ask did you press them properly? I have a feeling that MAYBE some of the problems could be solved with heat, steam and elbow grease.
LikeLiked by 1 person
https://pin.it/44DjAOv I am sorry it’s in Russian, but the arrows show where to ease the fabric in and waves where to stretch.
LikeLike
The knock knee adjustment that I made skews the lower part of the leg to one side. It makes them just about impossible to press. Just one more reason to eliminate it!
LikeLike
Sure Fit designs have some free videos that may help with fitting issues. Glenda sells master pattern sets to draft your own patterns but many of her videos are free and very informative, one of them is measuring yourself and includes pointers of measuring without the help of someone else.
LikeLiked by 1 person
I’ll have to look into that! Measuring oneself is difficult. Oh, to have a fitting buddy.
LikeLike
Beautiful! I stand in humble awe of your perseverance!
LikeLiked by 1 person
Thanks for overlooking all their flaws! I just need a break before I jump back into the arena again.
LikeLike
I loved your comment about “starting with only a set of numbers and turned them into a pair of wearable trousers.” I would consider that a big win any day! They trousers look great and I bet you learned so much useful information for when you start your next pair. Even a pattern right out of the envelope rarely fits exactly like we want without being tweaked and sometimes thrown in the garbage. You did well!
LikeLiked by 1 person
Thank you for the kind words. I have SO much more to learn, but this was a good start. For now I just need to wear them. I’m finding that there’s a lot to be learned by just feeling how they react when I move. It gives me clues as to what my next adjustments might be.
LikeLike
Being of a similar vintage, I do enjoy reading you blog and admire your work…I’m tempted to have a go at recording my efforts too. Thank you for the link to the online tailoring course – I may give that a go. I too have suffered for my trousers and I am in no position to offer advice. But, a small change that might be worth trying on one of your muslins is to unpick the front pleat and turn it towards the fly rather than the side seam – you might find that the front of the fly area will lie a little flatter. All the best, Rob
LikeLiked by 1 person
Thank you, Rob. I may give that a try on my next pair. I’ve also considered stitching the pleat down say 1.5 – 2 inches. A part of me thinks that won’t be the answer, however. But what’s one or two more muslins!
LikeLike
this is one of the best posts I’ve read on the “thrill of victory, the agony of defeat” as applied to the pants making journey. Yes we have all been there! thanks for posting, and they do look great with the various shirts.
LikeLiked by 1 person
Hi Dwayne, Here I am in my sewing room messing with a pant sloper and ripping my hair out when your post came across my computer. I think you made great progress. I completely understand that you would like it better. I am working with a “kit” from Surefit Designs and have my doubts that it will result in a usable sloper. I have scheduled one zoom call with the owner and will try one more. My next line of attach will be the “Minot” method as outlined in a a very technical book offered by Ryliss at the Sewing and Design School in WA. I too have the lack of measuring help issue.
I can’t thank you enough for posting this. I am determined to beat my pants nemisis in 2021.
LikeLiked by 1 person
I have faith that we will both get there!
LikeLike
Don’t knock the knock-knee adjustment! It is an exercise I have been through several times. Is it more common for women I wonder? My sewing class teacher assures me that she corrects for knock knees every time. I think you have made a valiant effort and hopefully you wull achieve the result you are looking for next time. Trousers are still on my RTW list rather than my sewing projects list, alas.
LikeLiked by 1 person
The knock knee adjustment has to GO! I don’t think I needed it, and it makes pressing the creases a chore since the lower portion of the pant leg has been skewed to one side. Live and learn!
LikeLike
I think the final pants look pretty good. Like reader K.S., I’d like to know what issues you have with them. Two thoughts: I think you’d have a much easier time if you started with a flat-front pant draft. It’s easy to add a pleat, but with the pleat, it’s more difficult to tell where you may have too much fullness. Also, with the hem pooling on your shoes, it’s hard to tell how they’re actually draping. It might be easier to read the fit if you at least rolled them up a bit. Finally, do you own a pair of dress pants whose fit you’re satisfied with? How do your final pants compare to those?
LikeLike
Peter, the drag lines at the pleats are driving me crazy. Oddly enough I think they are caused by taking out some of the back inseam as suggested in a Threads article. I feel it when walking. That the front of the pants are being pulled back. I may be all wet, but I’m going to undo that adjustment on the next version. The knock knee adjustment has to go. I don’t think I needed it. Plus it makes pressing the trousers damn near impossible because the section from the knee down has been skewed to one side. I agree that there is too much break at the cuff. Plus wearing suede desert boots wasn’t the best idea! Onward HO!
LikeLike
First, your shirts are great and you should be proud!
Secondly, I wouldn’t have noticed if you hadn’t pointed out what you don’t like.
Third, I just spent the better part of a day trying to follow directions to draft a pants pattern then comparing the result to both pants I like and pants I made that aren’t quite perfect and am completely baffled by the comparison so I’m with you all the way on the journey.
I’m in your age group, too. I guess I look at all my sewing puzzles and trying to solve them as my “dementia protection program” and am glad I’m still learning….if painfully.
Thanks for your great post!
LikeLike
Hi Duane, looks like you are mostly there. I’m with you on the difficulty of pants fitting! I agree with Peter on maybe too much length prevents an unblocked “hang” to see what’s going on. My favorite fitting site is “In House Pattern Studio”. Alexandra has pants videos which are on my to do list. Her other fitting info has been eye opening to me and have solved many of my head scratching problems. 😊
LikeLike
Wow, what a work. I am so happy. I much like. Good job work. Beautiful pattern. Good look. Comfortable shuit.I appreciate to work.
LikeLike
That is a weird looking pattern draft in picture 3, especially the back with its large waist and smaller seat levels. Could there be a construction error somewhere? Measures waist 88 and seat 102 aren’t that unusual with their 14 cm difference.
LikeLike
There is actually supposed to be a second dart at the waist. I didn’t draw it in.
LikeLike
I think they look great. I don’t think they are a failure.
LikeLiked by 1 person
Not a failure at all. They just need a “fine tuning”. I’m just not sure where to tune!
LikeLike
In sewing garments, effort and time does not always reward you with great results but the things learned through failures are never forgotten and that is valuable beyond measure.
I agree with Peter about mastering a flat front pant and then adding in the pleats. From a fitting perspective it is so much easier to actually read how the fabric and pattern are on your body when there are fewer design elements to skew your evaluations.
Wish you were nearby, I would love to come work through the fitting with you. In recent years I have discovered that I love the fitting and alterations process so much more than pattern sewing, but primarily working with youthful women’s figures has its limits. I would love to work through it in menswear with someone who understands garment construction.
For what it’s worth, I have learned so much about garment construction techniques by dis-assembling higher-end garments from thrift stores – men’s suit jackets are a marvel of construction much like structured gowns. I also highly recommend “sacrificing” a garment which already fits you perfectly to create an exact pattern from it. Most of us are so hesitant to go this route, but how much is your time worth if it takes you a half dozen muslins (wearable or not) to get you to the same place, not to mention all the materials used. To “sacrifice” a beloved garment in order to reproduce it endlessly is so worth it for me. And, if you are careful in your disassembly, the original garment need not be truly sacrificed, but just re-assembled.
Keep up the good work! Enjoy the journey of learning!
LikeLike
You make them look perfect.
Wish there was an MPB Day for you to get measured at (in a Panera!) – there have been amazingly skilled folks who materialize more often than not, and might impart some knowledge on how to handle the mature gents “minimus gluteous” (Where did it go? Not that I had much to start with.).
LikeLike
Well this post had me laughing so hard I think I snorted chardonnay out my nose. I have decided to just always wear loose trousers as it is out of realm to get a fit yet. For the record, these do not look bad at all. With the hermes shirt tail out look who will know whats happening in the seat. When dreams come true some bespoke trousers from any Savile Row tailor is on my list. Your finishing is exquisite and your journey is enlightening, thanks for writing all about it.
LikeLike
The most useful adjustment for a flat seat is to turn the crotch curve into an L shape at the bottom of the curve. Takes out all that extra fabric where your buttocks and thighs don’t have extra flesh. Can alter rtw trews to make THEM fit better, too.
Good luck on your pants-fitting odyssey. It’s an adventure worth undertaking.
LikeLike
Thank you for this post! You definitely are not alone. Other things happen, for example the fashion fabric is a natural fabric and starts to “relax” during the day. Or my weight changes, or I work out more and then “hello, full butt adjustment!.” I made the simplest of trousers – in a ponte! And I did a couple of adjustments and they fit so well!!! And then after a month or so of wearing them there is fabric pooling in the front crotch area (?????). I liked Ms. Wilder’s suggestion and sacrifice a pair of well fitting trousers and make a pattern from them. In any case…. I think that these are looking really good!! And a re-visit down the road, once you have had a long break (and forget everything) Ha Ha! You will be at it again and so will we all! @ sew_sister 😉
LikeLike
Well I think they look OK too, but fully understand you not being 100% happy with the results…we are our own worst critic afterall, me included. I also suffer the solo-fitting curse and have to accept that things won’t be as perfect as I would like.
When I look at your trousers I wonder if removing approx 1cm (1/2 inch) from the centre front at the waistband edge, tapering to nothing at the belt loop just before the pleat, might help?
I’ve never done a knock-knee adjustment, but after reading about it some time ago wondered if the legs would be skewed in the finished pants.
Don’t forget that each fabric will change how any garment will fit/hang/etc due to fabric weight, texture, composition etc. In the last few weeks I’ve made pants for myself out of different fabrics and none are the same as the next pair.
If you get a wearable pair of trousers, then you are way ahead of most people. 😉
LikeLike
Just letting you know that I enjoyed this post very much, and I have confidence that your next pair will be even better because, as you’ve learned first-hand, pants are a process. A process that drives most of us sewists absolutely NUTS … 🙂
LikeLike
When I draft men’s pants patterns, my go to reference is Kawashima’s “Fundamentals of Men’s Fashion Design.” His draft is straight forward and relatively easy to accomplish. I have used it for myself and many others since I started sewing/designing those several decades ago. Once I have a basic pattern, that is one with no pleats or waistband, I cut and sew a fitting muslin with grain lines drawn on the fabric to see any potential drag lines or location problems. For closure, I sew a simple center front rise zipper, and extend the waist a few inches since I don’t have a waistband at this point. During the fitting I pull the the muslin up to where I feel the crotch is just right and tie a 1/4” elastic around my waist and mark around that location. You can also do the sit test and mark any extra ease for the back rise. I also mark the knee cap to mark on the final paper pattern. Later, after all fitting marks and alterations are added to the original pattern, I’ll make another muslin with waistband, center zip, try on and mark pocket locations, and any pleats that might be added. Pleats can be tricky, if you slash and spread too many times, you’ll end up with a really baggy upper portion. There is, of course, much more to the process, but this is my basic technique.
LikeLike
It’s funny that we tolerate ill fitting RTW pants but criticise our own makes so much. I am also in the process of getting a sloper fitted and like you “taking a break”. For the pooling fabric under the butt (something I have too), try the flat seat adjustment where you take a “dart” out of the back – Stylearc Patterns have a blog post on how to do it. Good luck!
LikeLike
Oh, I’m just certain we are all feeling your pain here. I gave up on trousers, only sewing leggings, joggers and track pants for a while because of the fitting issues. Then I discovered the Style Arc Linda pants pattern, which with a slight increase in the front and back rise and also in the waist measurement (very easy to do) fitted me like a glove. I must admit to not having tried self drafting pants for myself; the problems surrounding a naturally very short waist, flat bottom, long legs + a waist to hip ratio that doesn’t work with most patterns had me stumped.
I would completely agree with Vicki Maiorano about Style Arc’s website and good blog posts. It’s a shame they don’t do men’s patterns but the Linda is a very basic pattern that (with the addition of a fly) might be a possible jumping off point for you.
LikeLike
I loved reading this. Thank you Duane! I have every faith you’ll reach your trouser nirvana 🙏
LikeLike
Oh, I’ve read this story before! I’m so sorry you’re frustrated with the fit—but thank you SOO much for sharing the trials and the process, not just a final triumph.
While these may not technically fit perfectly, I think it’s really easy to get wrapped up in fine details of fit, especially with pants. They’re fine, and in the shots where you’re actually moving, as opposed to standing straight front and back, the “issues” aren’t even visible. In other words—yes, I’d say these are a win!
LikeLike
Hey Duane. First, I think that your sewing/tailoring skills are exceptional. I’ve been following you for some time now, and am always delighted to see the wonderful things that come from you and your sewing machine.
I know how you’re feeling about taking the next step as a sewist, and trying your hand at pattern drafting. I’m sticking my toe into those waters too. Not really to any great extent, but I do commiserate with you on your pant draft.
Of course you know that good, bad or indifferent, the end result is a learning experience, so it’s not a “failure”.
Upon seeing the striped “wearable muslin” I immediately thought of a few different pattern drafting systems that you might consider. I have both, have tried both (although not for pants) and did indeed have success with them.
The first is Connie Crawford’s ” Patternmaking” tome. I use it to re-draft a one piece sleeve pattern into two. I can tell you that her method is simple, straightforward, and it works. I’d tried a different system that was featured in an issue of VPM years ago, and it was a total head-scratching tosser.
Connie Crawfords’ entire line is owned by Janet Pray of Islander Sewing Systems at present. I got the Pattermaking book from a seller on ebay for a fraction of the price that they going for new. It’s not the latest edition (I have the second edition), but I have it on good authority that they’re basically the same.
I took a look-see as to whether or not men’s pant drafts are addressed in Patternmaking, and yes, Crawford does include instructions as to how to go about doing that. You might want to check out ebay or IslanderSewing.com if you’re interested in learning more. Also, emailing Janet Pray and asking her thoughts about using the book might help, as well. Janet is really knowledgeable and honest.
Another pattern drafting system you might try (or look into) is SureFit Designs. It’s owner is Glenda Sparling. She’s had her business for quite some time, and seems to have quite the worldwide following. Again, I’ve not drafted trousers using her system (basically a connect-the-dots kind of a thing, but I’d humbly suggest to not let that distract you), but I did do a men’s shirt that came out really well.
Sure Fit Designs has kits for the different types of garments…dress, pants, shirt, childrens, and men’s pants. Now, in order to use the men’s pant kit, one must have the pant kit that is intended for women, and modify that according to the instructions set forth in the men’s booklet.
If you go on her site: SureFitDesigns.com you can access a video that describes what all that entails. It can also be seen on YouTube: https://www.youtube.com/watch?v=gMAFVkiEKQM&t=161s
A way around spending lots on the two kits would be to check ebay for her pant kit, and then get the men’s kit as a stand alone purchase from her. The kits on ebay are the older, or first editions, but I’m pretty sure that they’re the same as the newer ones she sells now. I got mine at a tag sale (all three) for less than twenty dollars.
One other thing that I’d suggest, if you want to carry on with the system you’ve already invested time and money in would be to get someone to measure you (preferably someone that knows how to sew, but if not, just be specific about what you need and how to take the measurements) and do a whole new draft. I am almost positive that you will be a lot more satisfied with the new draft/muslin.
Anyway, thanks for taking the time to post all your wonderful garments. It’s a real treat seeing your makes. Also, I’m not affiliated with either of the aforementioned companies, yada yada. 😉
Happy Sewing.
Kim
LikeLike
One more thought about getting someone to take your measurements. Is there a tailors’ shop in your area? If so, you might be able to pay her or him to take a full set of measurements for you. Or, if there’s a chapter of ASG or someone that belongs to ASDP in your area, that may be a way to get your measurements taken, for probably little or nothing.
LikeLike
Hey Again Duane. Sorry to keep going on and on about this. I promise that this will be the last time…but something occurred to me that might explain why your initial draft was off.
You stated that you took measurements from your body AND a pair of well-fitting trousers. I think that that may be where you went off the rails a bit.
Consider this.
If I were to take measurements from two “sources”…people, person and dressform, person and garment….and combined the measurements in order to do a draft, which “person” would the draft be suited for? One? Both?
You see what I’m driving at?
In order for the draft to be accurate, ALL the measurements have to originate from the same source, if it’s going to have a chance of even beginning to fit correctly.
So again, I’d strongly urge you to see about getting someone to take your mearsures for you, so that you can stand still and erect while they’re being taken. OR, take the measures (all of them) from the well-fitting pair of trousers (just to see what happens…or do a rubbing…I’ve done that per Kenneth Kings’ instructions on his Craftsy tutorial “Jeanious” and they came out pretty spot-on).
Anyway! Enough said. Just a few (more) thoughts. 🙂
Hope they help.
Kim
LikeLike
Hey Again Duane!
I know that I’d said “no more suggestions”, but I remembered two online/in-person tailoring schools that you might find interesting. One in Dallas, TX:
https://the-abta.com/online-workshops/
And one in Ireland:
https://www.handcrafttailor.com/
Both owner/operators point to connections with Saville Row tailors. Hope you find it interesting.
LikeLike
Thank you for this 100% relatable and hilarious post. I miss sewing blogs. Trouser fit is a lifelong journey, especially for those of us who shape shift every few years. Or is that called aging? Kudos to you, your trousers are indeed wearable, and good luck.
LikeLike
Well, I think they look amazing! I’m Speaking as one who has had a few pant making journeys of my own. If you ever give up sewing you could become a full time writer. I could read your posts every day. You take us all on your journey with you. Thank you so much for your work. I learn something with every effort you make.
LikeLike